How to integrate your Active Directory with Okta
I. Prep Work
1. Create a new user in Active Directory called svc_OktaSync (this name is just an example, please follow your internal naming scheme for service accounts). Make sure it has read permission on the Organizational Unit that holds the user objects to be synchronized into Okta for myPolicies.
2. Make sure a computer is available to have the Okta agent installed onto it (I would recommend installing it on a server). The computer must have .NET Framework 4.0 or higher installed.
3. The computer with the Okta Active Directory Agent installed on it needs to have outbound HTTPS Internet access.
II. Active Directory Integration
Okta Active Directory Agent Installation to Import Users from Active Directory
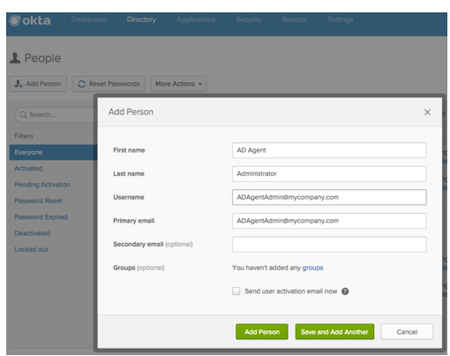
4. Add an Okta user and assign it the Super Administrator role.
Login in your Okta account.
Make sure to activate your Admin Account by clicking on the "Admin" button on the top-right corner:

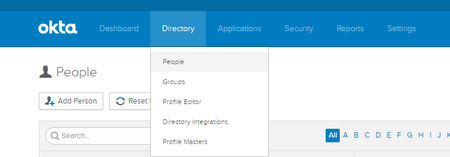
From the Okta page, select Directory > People, click Add Person to create a user.
For the Username, you can use OktaADSyncAgent@<YourDomain>.com
For the email address, use any email address where you can retrieve emails from. Send activation email.
For more information : https://support.okta.com/help/articles/Knowledge_Article/28774118-Installing-and-Configuring-the-Active-Directory-Agent
5. Installing and Configuring the Agent
From the Okta page, select Directory > Directory Integrations.

Select the Add Directory pull-down and then choose Add Active Directory.

On the Set up Active Directory screen, click Set Up Active Directory. The AD setup wizard starts.
Click Download Agent. The filename is similar to OktaADAgentSetup-3.2.1.exe.
Copy this to the server with outbound https access. Windows 2008 R2 or higher.
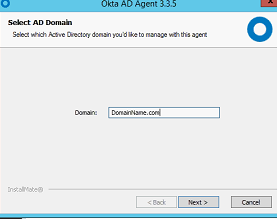
Verify this value is your Company’s active directory domain name.
Enter Okta active directory service account credentials. This was done in the prep work.
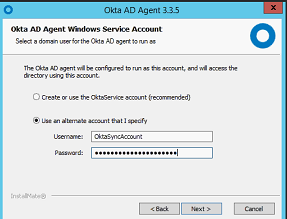
Make sure this user has read permission on Organizational Unit (OU) that holds the user objects to be synchronized into Okta for myPolicies.
6. Enter your Okta Organization URL
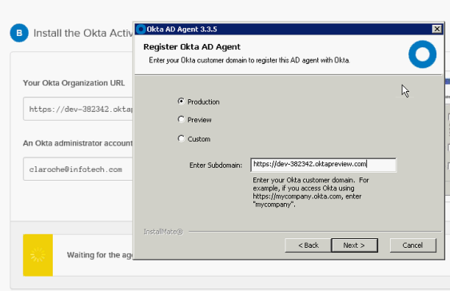
7. From the start menu, launch the newly installed Okta AD Agent Manager as an administrator, and make sure everything is green/healthy.
8. Go back to the Okta page and select Directory > Directory Integrations.
Choose the Organization Units (OUs) that you would like to connect to Okta.
Select the Frequency you would like Okta to import users from AD.
Okta Username Format: If your User Principal Name (active logon name) is the same as your email address, select user principle name. If not sure: select email address.
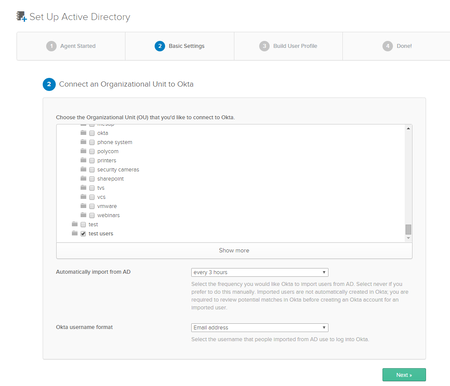
Continue AD set up and select following options:

9. Via the Okta page, run a Full Import by clicking on the "Import Now" Button.

10. Confirm Assignments for any valid users (check to Auto-activate new users after user confirmation as well).
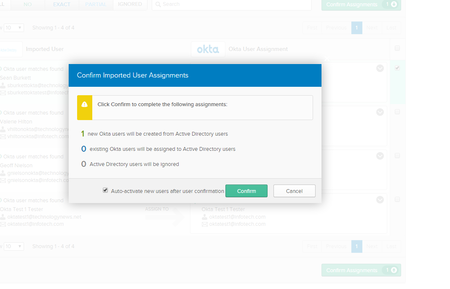
11. Sign in with active directory credentials to test if integration worked.
For any more information on installing the agent, click this link : https://support.okta.com/help/articles/Knowledge_Article/28774118-Installing-and-Configuring-the-Active-Directory-Agent
