View Document Library
7 minute read
Need More Answers?
General
Admin
View Document Library
1. Library Overview

1.1. The admin Library is renamed to Document Library with the addition of several columns and new filter functionality.
1.2. Columns in the table are as follows:
- Checkbox - Admins can check the box to perform certain operations such as Bulk Edit or Retire for the checked rows
- Name - name of the document
- Version - numeric value field displaying the latest version of the document
- Status - denotes the status of the document (Draft/Published/Retired, etc.)
- Tags - displays all the associated tags on the document
- Owner - displays the owner of the document
- Author - displays the author of the document
- Sponsor - displays the sponsor (s) of the document
- Distribution - profile and method used to distribute the document. It will display the list of Distribution Groups, e.g. All Staff, HR, IT, etc. and or if manually distributed, the value will display “Manual User Assignments”
- Doc Type - displays the type of document (form/policy/procedure)
- File Type - extension of the file (docx/PDF)
- Acknowledgment Required - displays if document attestation/acknowledgement is required. (Yes/No)
- Published - date documents was last published (MM/DD/YYYY)
- Last Updated - date when the document was last updated. (MM/DD/YYYY)
- Next Review Date - date of the next review date of the document. (MM/DD/YYYY)
- Action - ability to perform two actions:
- View Doc History by clicking the Clock Icon
- Delete clicking the Trashcan Icon when a document is in Draft status
The contextual buttons such as Bulk Edit, Bulk Retire are repositioned in Document Library table which is towards the top right side of the table and only visible as applicable documents have been selected.
2. Introduction of Filter Panel on the Document Library Page.
2.1 On the Document Library Page. A Filter Panel is available for Admins to click on, identified by “Filter & Save” buttons. The Filter Panel has two tabs namely, Filters and Save.
3. Application of Filters on the Document Library Table
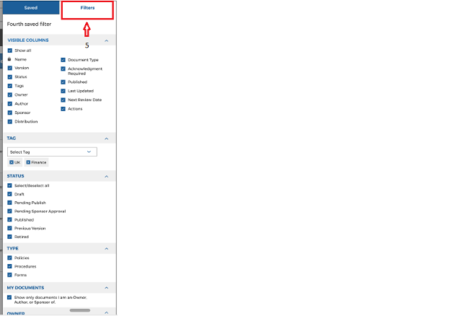
On the Filter Tab of the Filter Panel, the following Filter options are available to the Admins for precise customization and efficient filtering of the Document Library Table. Amins can navigate to the Filter Panel by clicking on “Filter & Save” button on the Document Library Page.Filter Option:
- Visible Columns - ability to select the desired columns from all the available columns to view in the table. Note: [Name] column is selected by default and cannot be unchecked
- Tags - multi-select field where the table will be filtered based on chosen Tags
- Status - denotes the current Status of the document (Draft/Published/Retired, etc.)
- Type - ability to filter by policies, procedures or forms
- File Type - filter on the file type stored for the policy
- Owner - displays the Owner of the document. Admins can select multiple values
- Author - displays the Author of the document. Admins can select multiple values
-
Sponsor – filter the Document Library table based on the selected Sponsor(s)
Show Results - ability to filter the results of the table
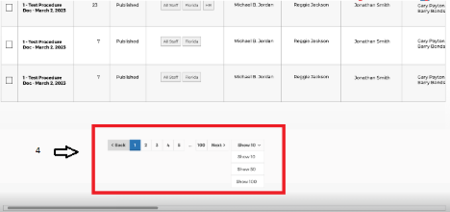
4. Pagination Bar in the Document Library Page
- Admins can choose the number of rows that will be visible on the page.
- The Pagination Bar provides flexibility to navigate to a desired page. Also, Admins can navigate to the desired page by clicking on the number on the pagination bar.

5. Introduction of Filters Tab in Filter Panel

This Tab allows Admins to configure Filters for the table, one or more filters can be applied:
The Filter selection(s) can be immediately applied in the Document Library by clicking on the “Filter” button at the bottom of the Filter Panel. Admins can Reset the applied filter(s) on the table by clicking “Reset” text available under Filters Tab. This will remove all the Filter(s) applied on that table. Default view of the table will be displayed when no filters are set.
6. Saving the Filter Combination
Admins can save the Filter Combination for future reference under the Saved tab in Filter Panel.- ave selected Filter values by clicking on “Save this filter combination” Text present at the end of Filters Tab
- required to enter a Name the Filter Combination
- the Saved Filter Combination will be displayed under the “Saved” Tab of Filter Panel
7. Renaming the Saved Filter Combination

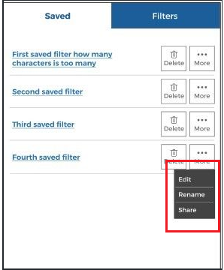
- can Rename the Saved Filter Combination by navigating to Filters & Save-> Saved-> More -> Rename
- click on [...More] to open the menu and click on Rename option.
- input a new name and click on [Tick Mark] icon to save the filter name.
8. Editing the Filter Combination
- click on [...More] to open the menu and click on Edit option
- after clicking on Edit button, Filter Panel will be open and Admins can perform the changes and click on Save button and a Success Popup will be displayed
9. Deleting the Filter Combination
- A Pop up will be displayed, click on the Trash Can Icon to Delete
10. Application of the Saved Filter Combination on the Document Library Table
Admins need to click on the Filter Name under Saved Tab of Filter Panel to initiate the application of a particular Filter on table.- The name of the filter is displayed on the top left side of the table
- Reset link is present giving the ability to remove the displayed Filter(s). This restores to the Default View of the Document Library Table
11. Bulk Check Feature on Document Library Table
Bulk Check Feature is introduced providing Admins the flexibility to perform Bulk Operations on multiple documents.- The Bulk Check feature has two options, 1. ‘Select all on page (number n)’, 2. ‘Select all (number n)’
- Functionality for ‘Select all on page (number n)’ – On click, all rows on a particular page will be selected at once and contextual buttons will appear as per the selection. ‘n’ denotes a numeric value and tells how many rows are present on the page.
- Functionality for ‘Select all (number n)’ - On click, all the rows across all the pages of Document library table will be selected at once and then contextual buttons will appear as per the selection. ‘n’ denotes a numeric value and tells how many rows are present in total in the document library table.
- To undo your selection made, Admins can click on ‘None’ option available, this will deselect the rows which were selected.
- Note: Apply the Filters to your Document Library Table to make the best use of this feature. Example: If no filters are applied and the Document Library consists of all status of documents such as draft, publish, no contextual buttons will appear on the page.